

Fees
A fee is a flat charge you put on top of the work itself: rush delivery, travel, a permit, a weekend call-out. Saving one here means you write the name, the amount and the wording once, and from then on you add it to any estimate in a couple of clicks.
You'll find your saved fees under Presets in the sidebar, on the Fees page.
Where fees are used
Fees belong to estimates. They are not part of a service, they are never copied from one, and they do not change what a service costs you to deliver. A saved fee sits in your list until you add it to an estimate, and only then does it start affecting a price.
Adding one happens on the estimate's Adjust Estimate page, on the Fees card. Adjusting an estimate covers that card in full, including how a fee's amount can be changed for one job only.
TIP
This is the main difference between fees and your other saved lists. Tasks and Materials are built into a service and copied into the estimate with it. A fee skips the service entirely and goes straight onto the estimate.
What a saved fee holds
Three things, and nothing else:
- Name is what the fee is called, both in your list and on the estimate. Each name has to be different from your other fees; if you reuse one, Priscale tells you a fee with the same name already exists and asks for another.
- Amount is the flat charge. It is the amount filled in for you when you add this fee to an estimate, and you can change it there for that estimate without touching the saved one.
- Details is optional wording that travels with the fee onto the estimate, so your customer can see what the charge covers. Something like "Delivery outside the metro area" saves you explaining it later.
Creating a fee
There are two ways to end up with a saved fee, and they both leave you in the same place.
From the Fees page
- Click Create New. A panel slides in from the right.
- Fill in the Name, the Amount and, if you want it, the Details.
- Select Create Fee to save the fee and close the panel, or Save & Create Another to save it and clear the form so you can keep going. That second button is the quickest way to get your usual charges in for the first time.
From an estimate
On the Fees card of an estimate, Create new creates the fee and adds it to that estimate in one step. It is saved to this list as well, so the next estimate can pull it in with Use existing. Nothing extra to do: a fee you invent while building an estimate is already reusable.
TIP
It is worth setting up the handful of charges you bill most often before you build your next estimate. Once they are here, Use existing on the estimate fills in the amount for you and there is nothing left to type.
Your fee list
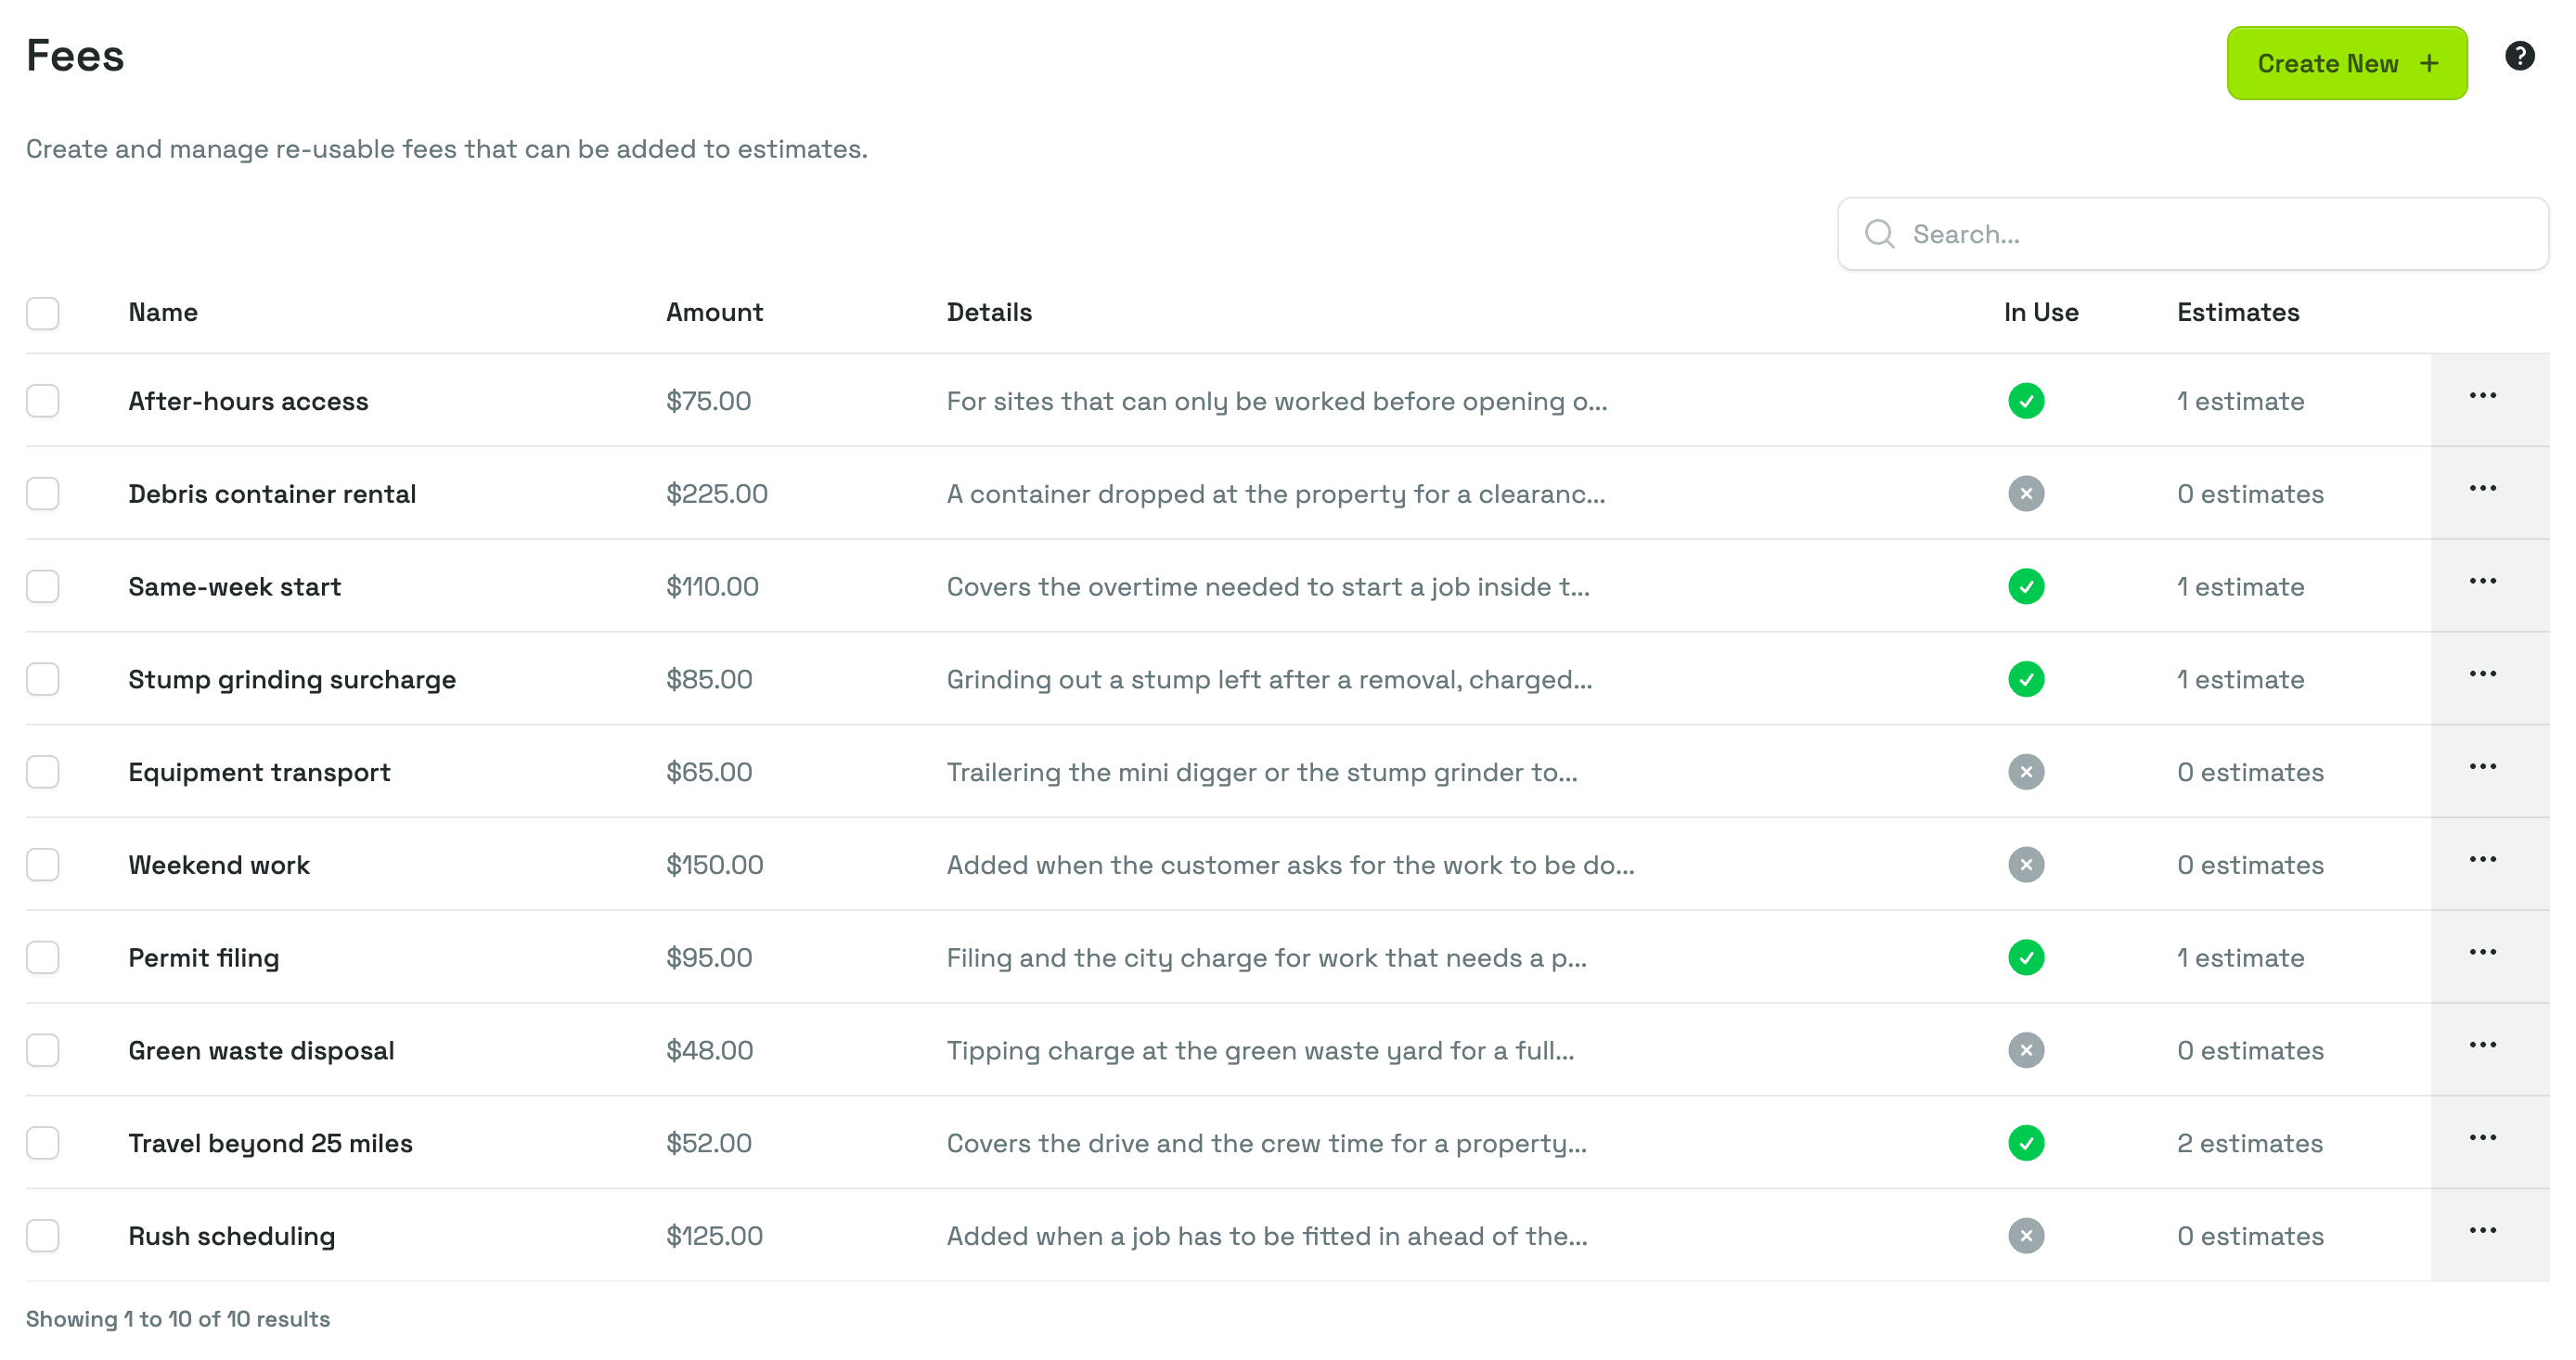
The Fees page lists everything you have saved, with a row per fee:
- Name and Amount are what you saved. Click either heading to sort the list by that column.
- Details shows the beginning of the wording, so you can tell two similar fees apart at a glance.
- In Use carries a green check when the fee is on at least one estimate, and a grey mark when it isn't.
- Estimates counts how many estimates it is on.
The search box filters the list by name. Clicking a row opens that fee, and the button at the end of a row opens a menu with Open, Edit and Delete. To clear out several at once, tick their checkboxes and choose Actions → Delete.
Reviewing a fee and where it is used
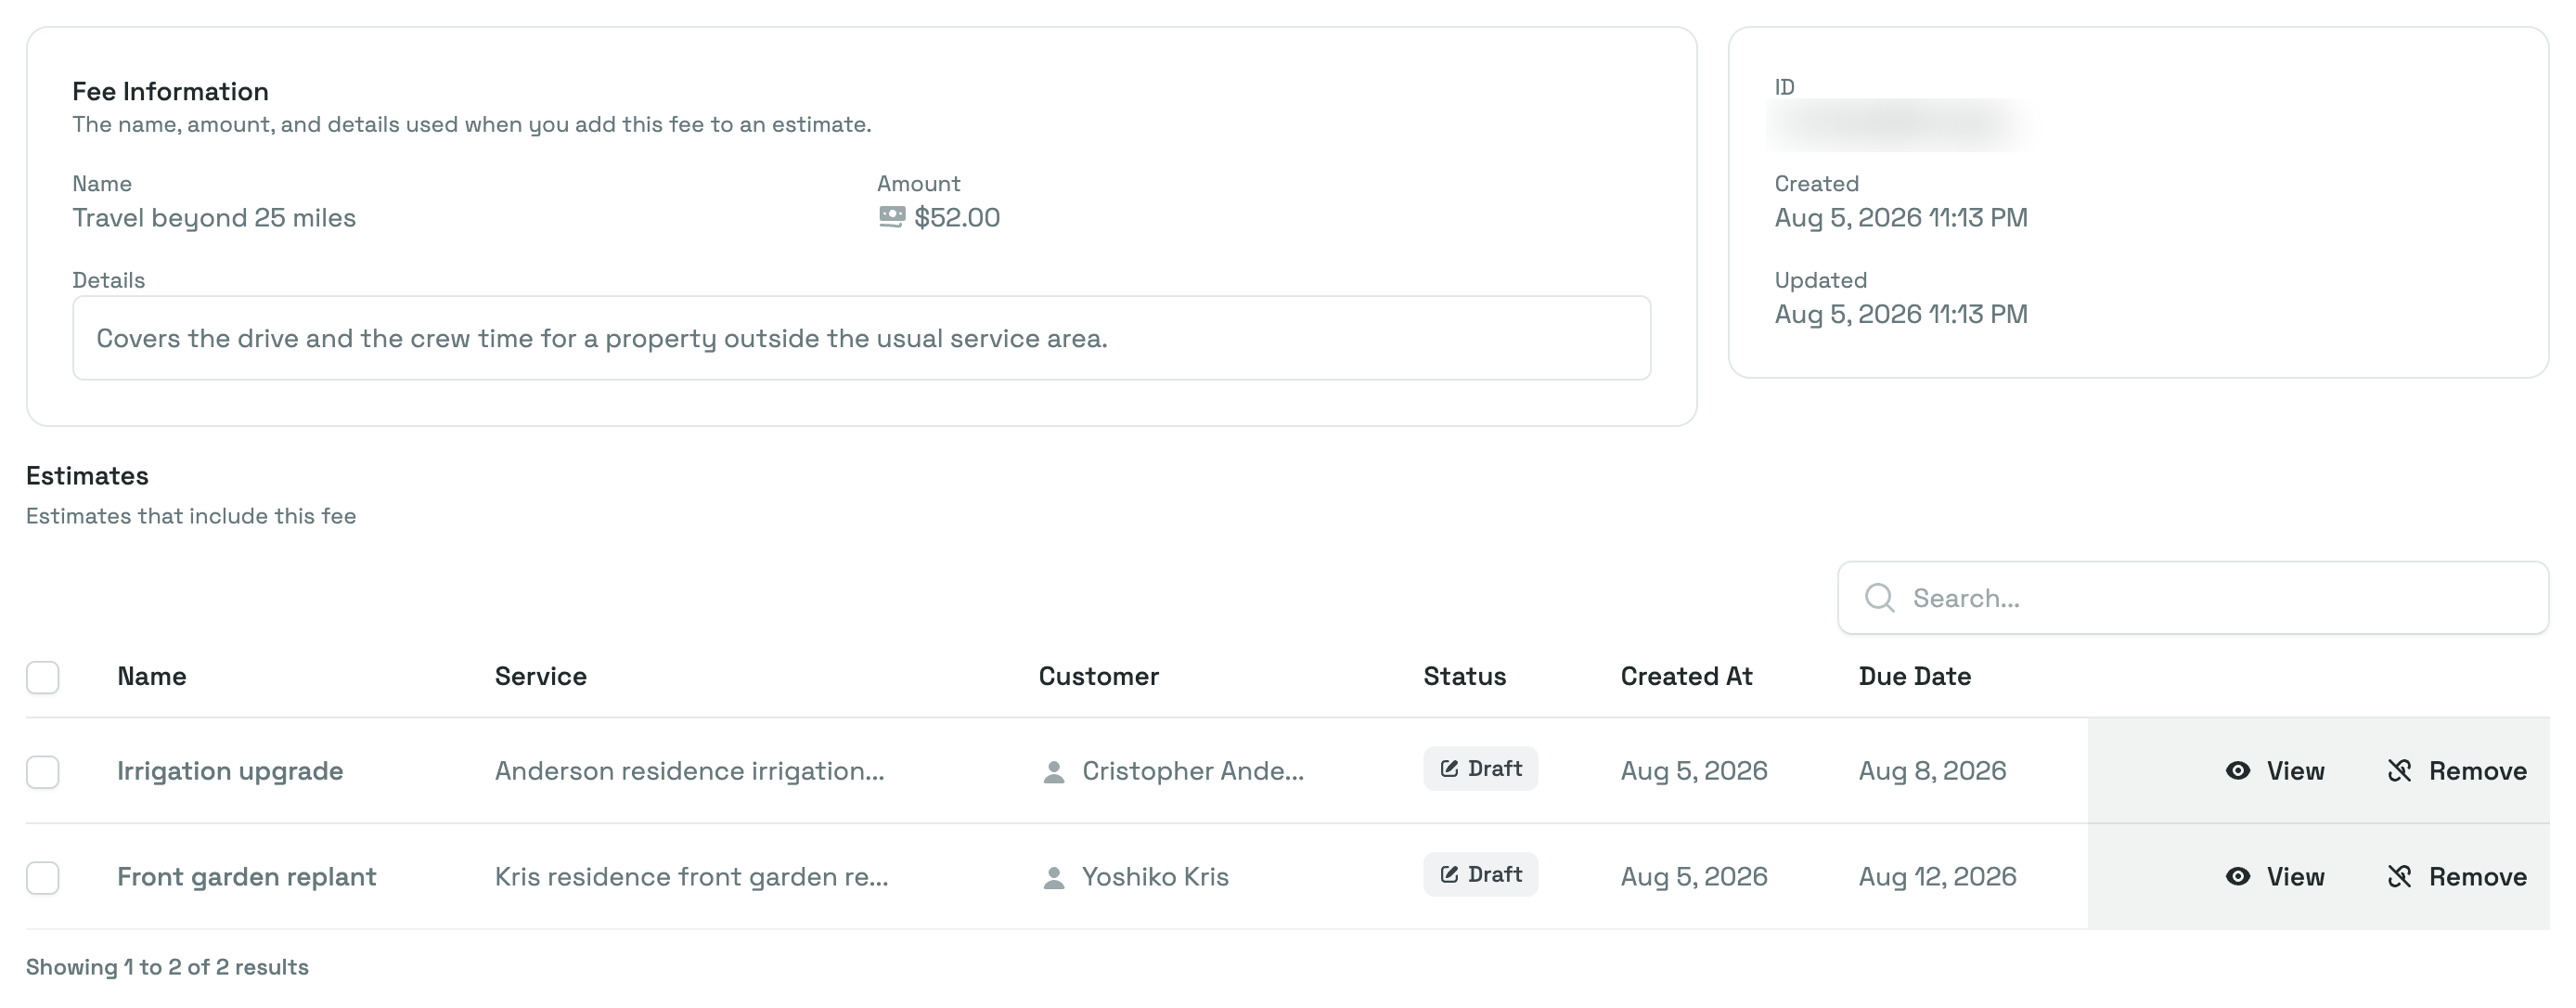
Opening a fee shows what it holds and where it is being used.
The Fee Information card repeats the Name, the Amount and the Details as they are saved right now. A smaller card beside it, below it on a narrow screen, carries the fee's ID, which you can copy if you ever need to reference it with support, along with the Created and Updated dates.
Under them, Estimates lists every estimate that includes this fee, with:
- the estimate's Name
- the Service it came from
- the Customer
- its Status
- when it was created and when it is due
A search box above the table filters it by estimate name. On a row, View opens the estimate and Remove takes this fee off it. Checkboxes and Actions → Remove do the same for several estimates at once. If the fee isn't on anything yet, the page says so instead.
Removing a fee here only works while the estimate is still Draft or In Progress. On one that is Complete (including a canceled one) or Past Due, the fee stays where it is. Remove is greyed out on that row, and if you use the checkboxes and Actions → Remove, those estimates are skipped and Priscale tells you only estimates still open for changes can be updated.
Editing and deleting a fee
Edit, either from the row menu or from the buttons at the top of the fee's page, reopens the same three fields. Save changes stores the new version.
Estimates that already use the fee are not touched by an edit. What went onto an estimate is a copy, so the name, wording and amount it is carrying stay as they were when it was added. Your edit applies to the next estimate you add this fee to.
WARNING
A fee can only be deleted while it is not on any estimate. A fee that is on one stays in place, and Priscale explains why. The same applies to a bulk delete: the fees still in use are skipped and the rest go. Take the fee off the estimates listed on its page first, then delete it.
Related pages
- Adjusting an estimate covers the Fees card where a saved fee is actually put to work.
- Tasks and Materials are the saved lists that go into a service instead.
- Agreements covers the terms and conditions sent alongside the price.